前言
React 只是 DOM 的一个抽象层,并不是 Web 应用的完整解决方案。有两个方面,它没涉及
- 代码结构
- 组件之间的通信
不使用 Redux 或者其他状态管理工具,不按照一定规律处理状态的读写,代码很快就会变成一团乱麻
需要一种机制,可以在同一个地方查询状态、改变状态、传播状态的变化
设计思想
- Web 应用是一个状态机,视图与状态是一一对应的。
- 所有的状态,保存在一个对象里面
基本概念和 API
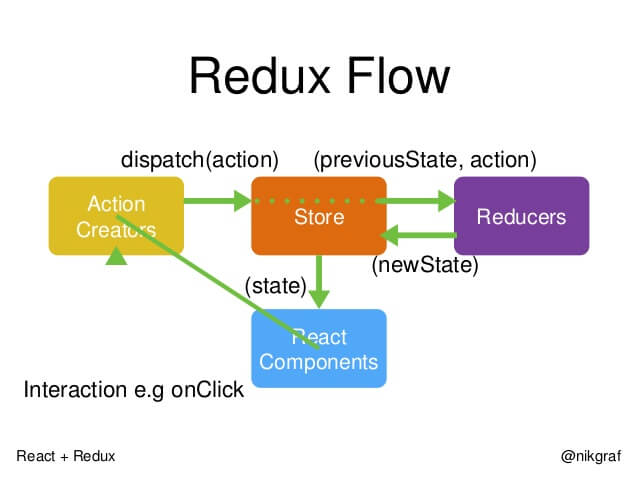
Store
Store 就是保存数据的地方,整个应用只能有一个 Store
Redux 提供createStore这个函数,用来生成 Store
|
|
State
想得到某个时点的数据,就要对 Store 生成快照。这种时点的数据集合,就叫做 State
当前时刻的 State,可以通过store.getState()拿到
Redux 规定, 一个 State 对应一个 View。只要 State 相同,View 就相同
|
|
Action
State 的变化,会导致 View 的变化。用户接触不到 State,只能接触到 View
State 的变化必须是 View 导致的。Action 就是 View 发出的通知,表示 State 应该要发生变化
Action 是一个对象。其中的type属性是必须的,表示 Action 的名称
|
|
Action 描述当前发生的事情。改变 State 的唯一办法,就是使用 Action。它会运送数据到 Store
Action Creator
View 要发送多少种消息,就会有多少种 Action。可以定义一个函数来生成 Action,这个函数就叫 Action Creator
|
|
store.dispatch()
store.dispatch()是 View 发出 Action 的唯一方法
|
|
Reducer
Store 收到 Action 以后,必须给出一个新的 State,这样 View 才会发生变化。这种 State 的计算过程就叫做 Reducer
Reducer 是一个函数,它接受 Action 和当前 State 作为参数,返回一个新的 State
|
|
整个应用的初始状态,可以作为 State 的默认值
|
|
store.dispatch方法会触发 Reducer 的自动执行
Store 需要知道 Reducer 函数,做法就是在生成 Store 的时候,将 Reducer 传入createStore方法
|
|
Action 对象按照顺序作为一个数组
|
|
纯函数
Reducer 函数最重要的特征是,它是一个纯函数。也就是说,只要是同样的输入,必定得到同样的输出
Reducer 是纯函数,就可以保证同样的State,必定得到同样的 View
Reducer 函数里面不能改变 State,必须返回一个全新的对象
|
|
store.subscribe()
Store 允许使用store.subscribe方法设置监听函数,一旦 State 发生变化,就自动执行这个函数
|
|
store.subscribe方法返回一个函数,调用这个函数就可以解除监听
|
|
Store 的实现
Store 提供了三个方法
- store.getState()
- store.dispatch()
- store.subscribe()
|
|
createStore方法的一个简单实现,可以了解一下 Store 是怎么生成的
|
|
Reducer 的拆分
Reducer 函数负责生成 State。由于整个应用只有一个 State 对象,包含所有数据
三种 Action 分别改变 State 的三个属性
- ADD_CHAT:chatLog属性
- CHANGE_STATUS:statusMessage属性
- CHANGE_USERNAME:userName属性
|
|
Reducer 函数拆分。不同的函数负责处理不同属性,最终把它们合并成一个大的 Reducer 即可
|
|
Redux 提供了一个combineReducers方法,用于 Reducer 的拆分
|
|
combineReducer的简单实现
|
|
把所有子 Reducer 放在一个文件里面,然后统一引入
|
|
工作流程
|
|
计数器
|
|
为Counter添加递增和递减的 Action
|
|
中间件的概念
Action 发出以后,Reducer 立即算出 State,这叫做同步;Action 发出以后,过一段时间再执行 Reducer,这就是异步
中间件就是一个函数,对store.dispatch方法进行了改造,在发出 Action 和执行 Reducer 这两步之间,添加了其他功能
发送 Action 的这个步骤,即store.dispatch()方法,可以添加功能
要添加日志功能,把 Action 和 State 打印出来,可以对store.dispatch进行如下改造
|
|
中间件的用法
redux-logger提供一个生成器createLogger,可以生成日志中间件logger
将它放在applyMiddleware方法之中,传入createStore方法,就完成了store.dispatch()的功能增强
|
|
applyMiddleware方法的三个参数,就是三个中间件。有的中间件有次序要求,使用前要查一下文档
|
|
applyMiddlewares()
Redux 的原生方法,作用是将所有中间件组成一个数组,依次执行
|
|
异步操作的基本思路
同步操作只要发出一种 Action 即可,异步操作的差别是它要发出三种 Action
- 操作发起时的 Action
- 操作成功时的 Action
- 操作失败时的 Action
以向服务器取出数据为例,三种 Action 可以有两种不同的写法
|
|
除了 Action 种类不同,异步操作的 State 也要进行改造,反映不同的操作状态
|
|
整个异步操作的思路
- 操作开始时,送出一个 Action,触发 State 更新为”正在操作”状态,View 重新渲染
- 操作结束后,再送出一个 Action,触发 State 更新为”操作结束”状态,View 再一次重新渲染
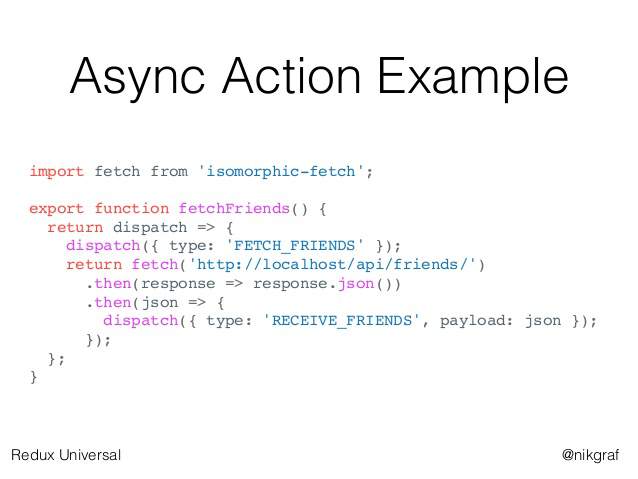
redux-thunk 中间件
操作结束时,系统自动送出第二个 Action
|
|
fetchPosts是一个Action Creator(动作生成器),返回一个函数
这个函数执行后,先发出一个Action(requestPosts(postTitle)),然后进行异步操作
拿到结果后,先将结果转成 JSON 格式,然后再发出一个 Action( receivePosts(postTitle, json))
|
|
Action 是由store.dispatch方法发送的。而store.dispatch方法正常情况下,参数只能是对象,不能是函数
这时,就要使用中间件redux-thunk
异步操作的第一种解决方案就是,写出一个返回函数的 Action Creator,然后使用redux-thunk中间件改造store.dispatch
|
|
redux-promise 中间件
Action Creator 可以返回函数,当然也可以返回其他值
让 Action Creator 返回一个 Promise 对象
使用redux-promise中间件
|
|
这个中间件使得store.dispatch方法可以接受 Promise 对象作为参数
|
|
redux-promise的源码
- Action 本身是一个 Promise,它 resolve 以后的值应该是一个 Action 对象,会被dispatch方法送出(action.then(dispatch))
- reject 以后不会有任何动作
- Action 对象的payload属性是一个 Promise 对象,那么无论 resolve 和 reject,dispatch方法都会发出 Action
|
|
UI 组件
React-Redux 将所有组件分成两大类:UI 组件和容器组件
- 只负责 UI 的呈现,不带有任何业务逻辑
- 没有状态(即不使用this.state这个变量)
- 所有数据都由参数(this.props)提供
- 不使用任何 Redux 的 API
|
|
容器组件
React-Redux 规定,所有的 UI 组件都由用户提供,容器组件则是由 React-Redux 自动生成。也就是说,用户负责视觉层,状态管理则是全部交给它
- 负责管理数据和业务逻辑,不负责 UI 的呈现
- 带有内部状态
- 使用 Redux 的 API
connect()
React-Redux 提供connect方法,用于从 UI 组件生成容器组件。connect的意思,就是将这两种组件连起来
|
|
mapStateToProps()
mapStateToProps是一个函数。作用就是建立一个从(外部的)state对象到(UI 组件的)props对象的映射关系
mapStateToProps执行后应该返回一个对象,里面的每一个键值对就是一个映射
|
|
mapStateToProps会订阅 Store,每当state更新的时候,就会自动执行,重新计算 UI 组件的参数,从而触发 UI 组件的重新渲染
mapStateToProps的第一个参数总是state对象,还可以使用第二个参数,代表容器组件的props对象
|
|
mapDispatchToProps()
mapDispatchToProps是connect函数的第二个参数,用来建立 UI 组件的参数到store.dispatch方法的映射
定义了哪些用户的操作应该当作 Action,传给 Store。它可以是一个函数,也可以是一个对象
mapDispatchToProps是一个函数,会得到dispatch和ownProps(容器组件的props对象)两个参数
|
|
Provider 组件
connect方法生成容器组件以后,需要让容器组件拿到state对象,才能生成 UI 组件的参数
React-Redux 提供Provider组件,可以让容器组件拿到state
|
|
原理是React组件的context属性
|
|
store放在了上下文对象context上面。然后,子组件就可以从context拿到store
|
|
实例:计数器
|
|
React-Router 路由库
使用React-Router的项目,与其他项目没有不同之处,也是使用Provider在Router外面包一层,毕竟Provider的唯一功能就是传入store对象
|
|